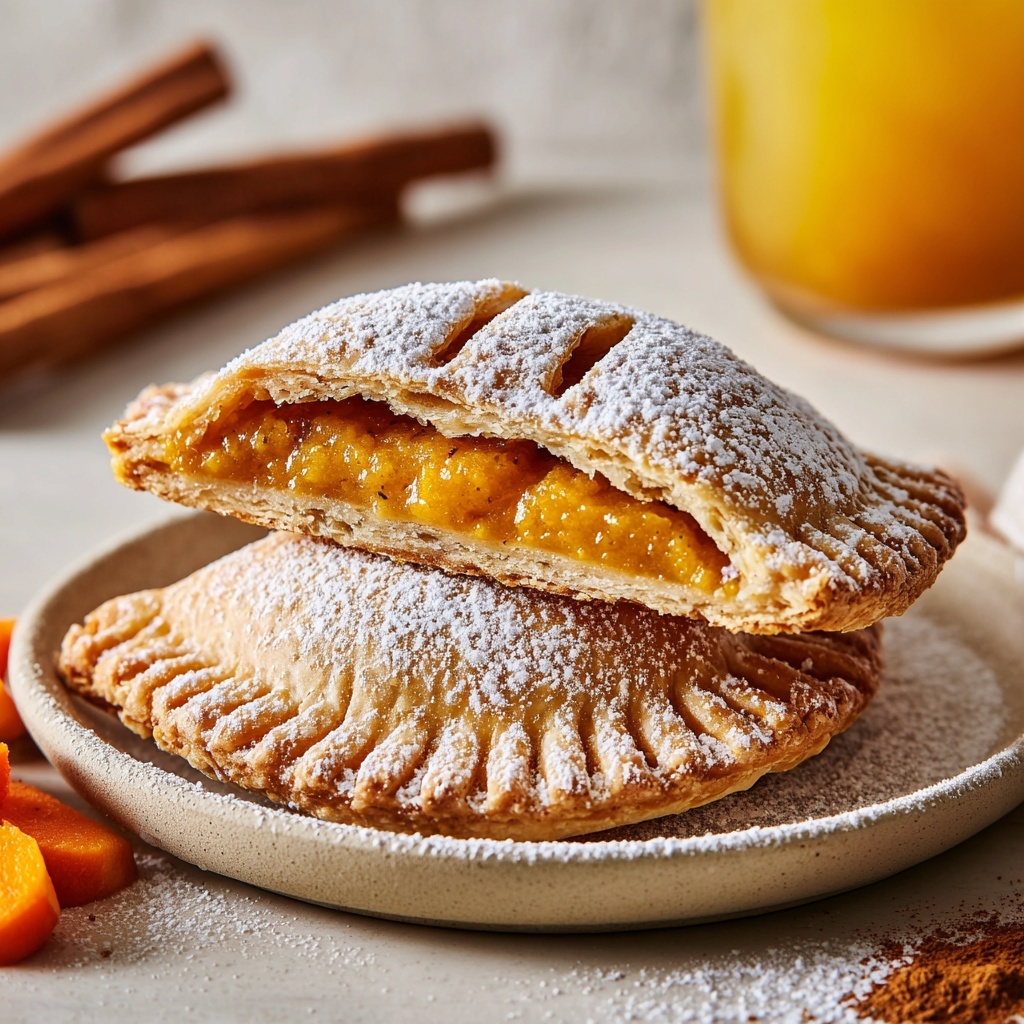
If you’re looking to bring the cozy, comforting flavors of fall right into your kitchen, this Pumpkin Hand Pies Recipe is an absolute must-try. These delightful little pockets combine flaky, buttery crusts with the warm, spiced pumpkin filling you know and love, making them perfect for sharing with friends or enjoying as an indulgent treat any day. Compact, portable, and irresistibly delicious, these hand pies turn classic pumpkin pie into a fun, bite-sized dessert that’s perfect for the season or whenever a little slice of autumn calls your name.
Ingredients You’ll Need
Getting your hands on the right ingredients is essential for making these pumpkin hand pies sing with flavor. Each component plays its role beautifully, from the flaky pie crusts creating that perfect golden shell to the spiced pumpkin filling that makes every bite taste like autumn.
- Refrigerated pie crusts (2 crusts): Provides a flaky, buttery base that’s super easy to work with and bakes up beautifully golden.
- Pumpkin purée (3/4 cup): The heart of the filling, offering smooth texture and that classic pumpkin flavor.
- Brown sugar (1/4 cup): Adds natural sweetness with a hint of molasses, deepening the pumpkin’s flavor.
- Pumpkin pie spice (1 teaspoon): A fragrant blend of cinnamon, nutmeg, and cloves that warms up the filling perfectly.
- Vanilla extract (1/2 teaspoon): Enhances the sweetness and rounds out the spices for a full-bodied taste.
- Salt (1/8 teaspoon): Balances the sweetness and highlights all the rich flavors.
- Egg (1, for egg wash): Ensures a shiny, golden crust that looks as good as it tastes.
- Milk (1 tablespoon): Mixed with the egg to give the crust a beautiful gloss during baking.
- Coarse sugar (optional): Sprinkled on top to add sparkle and a slight crunch for texture contrast.
How to Make Pumpkin Hand Pies Recipe
Step 1: Prepare Your Oven and Filling
Start by preheating your oven to 375°F (190°C) and lining a baking sheet with parchment paper to prevent sticking and ensure easy cleanup. Then, in a medium bowl, whip together the pumpkin purée, brown sugar, pumpkin pie spice, vanilla extract, and salt until smooth and creamy. This filling is where the magic of the Pumpkin Hand Pies Recipe truly begins, balancing sweet and spice perfectly.
Step 2: Shape the Pie Crusts
Roll out the chilled pie crusts on a lightly floured surface for easy handling. Using a cookie cutter or a glass, cut circles about 3 to 4 inches in diameter. These rounds give you the perfect size for hand pies that are easy to hold yet satisfying with each bite.
Step 3: Assemble the Hand Pies
Place half of your dough circles on the prepared baking sheet. Spoon about one tablespoon of the pumpkin filling onto the center of each dough circle, careful to leave a border so you can seal them properly. Brush the edges of the dough with water — this little trick helps the top crust stick firmly when you place the other half of the dough rounds right over the filling.
Step 4: Seal and Vent
Press the edges of the pies together using a fork to seal the filling securely inside, preventing any leaks while baking. Don’t forget to cut a small slit in the center of each pie to allow steam to escape, which keeps the crust crisp and prevents sogginess.
Step 5: Add Egg Wash and Sugar
Whisk together the egg and milk, then brush this mixture over the tops of the hand pies. This egg wash is what creates that gorgeous golden sheen. Sprinkle coarse sugar on top if you like a crunchy, sparkling finish—this step is totally optional but adds a lovely final touch.
Step 6: Bake and Cool
Pop your pies into the oven and bake for 18 to 22 minutes, or until they turn a beautiful golden brown. Once out of the oven, let them cool slightly before serving so that the filling firms up and you can enjoy them without burning your fingers. Voilà! Your Pumpkin Hand Pies Recipe is ready to delight.
How to Serve Pumpkin Hand Pies Recipe
Garnishes
These hand pies are wonderful on their own but can be dressed up with a light dusting of powdered sugar or a drizzle of warm caramel sauce for an extra sweet finish. A dollop of whipped cream or a scoop of vanilla ice cream on the side adds an irresistible creaminess that pairs perfectly with the spiced pumpkin filling.
Side Dishes
Pumpkin Hand Pies make a great dessert after a cozy fall meal. Pair them with a hot cup of spiced chai tea or peppermint coffee to make your snack time feel like a snug celebration. For brunch, they complement a savory spread of bacon, eggs, or fresh fruit beautifully, balancing sweet and savory flavors.
Creative Ways to Present
Get playful by serving the hand pies on a rustic wooden board lined with colorful autumn leaves or sprinkle some cinnamon around the platter for that autumnal vibe. You can also insert decorative toothpicks and use cute napkins to turn these pies into party-perfect treats everyone will adore.
Make Ahead and Storage
Storing Leftovers
These pumpkin hand pies keep well in an airtight container at room temperature for a couple of days or in the fridge for up to 4 days. Storing them properly helps maintain their flaky crust and moist filling, so you can enjoy them whenever a pumpkin craving strikes again.
Freezing
To save for later, freeze the unbaked pies on a lined tray until firm, then transfer them to a freezer-safe bag or container. When you want a fresh batch, bake them straight from frozen—just add a few extra minutes to the baking time. They also freeze nicely after baking if you prefer to prepare them ahead of time.
Reheating
Reheat your hand pies in a preheated 350°F (175°C) oven for about 10 minutes or until warm and crispy again. Avoid microwaving as it can make the crust soggy. This way, the pumpkin filling stays warm and cozy inside, and the pastry keeps that delightful crunch.
FAQs
Can I make these hand pies vegan?
Absolutely! Simply use a plant-based pie crust and substitute the egg wash with non-dairy milk or a mixture of maple syrup and water for a nice glaze. These swaps keep the Pumpkin Hand Pies Recipe just as delicious and suitable for vegan diets.
What can I do if I don’t have pumpkin pie spice?
No problem! You can easily make your own blend by combining cinnamon, nutmeg, ginger, and cloves to taste. This homemade mix will give you the same warm, cozy flavors that pumpkin spice is known for.
Can I use fresh pumpkin instead of canned purée?
Yes, fresh pumpkin can be used but requires cooking and pureeing beforehand. Roast or steam the pumpkin until soft, then puree until smooth. Keep in mind fresh pumpkin may have more water, so you might need to adjust the filling consistency slightly.
How many hand pies does this recipe yield?
This recipe makes about 10 to 12 hand pies depending on the size you cut out. They’re perfect for sharing with family or bringing to gatherings where bite-sized desserts shine.
Is it better to use refrigerated or homemade pie crust?
Both work wonderfully! Refrigerated crusts save time and hassle, while homemade crust lets you customize ingredients and flavor. Either way, the crust provides that flaky, golden foundation that makes this Pumpkin Hand Pies Recipe so delightful.
Final Thoughts
There’s truly nothing like the joy of biting into a warm pumpkin hand pie, filled with rich, spiced pumpkin nestled in a golden crust. Whether you’re new to baking or a seasoned pro, this Pumpkin Hand Pies Recipe is straightforward, fun, and incredibly rewarding. So roll out your dough, scoop that filling, and bake up a batch to share — your taste buds will thank you!
Print
Pumpkin Hand Pies Recipe
- Prep Time: 20 minutes
- Cook Time: 20 minutes
- Total Time: 40 minutes
- Yield: 10 to 12 hand pies
- Category: Dessert
- Method: Baking
- Cuisine: American
- Diet: Vegetarian
Description
These Pumpkin Hand Pies are delightful mini pastries filled with a sweet and spiced pumpkin mixture, perfect for fall dessert. Made with refrigerated pie crusts and a flavorful pumpkin purée filling, these hand pies are easy to assemble and baked to golden perfection, making a cozy treat for any occasion.
Ingredients
Pie Crust
- 1 (14 oz) package refrigerated pie crusts (2 crusts)
Filling
- 3/4 cup pumpkin purée
- 1/4 cup brown sugar
- 1 teaspoon pumpkin pie spice
- 1/2 teaspoon vanilla extract
- 1/8 teaspoon salt
Egg Wash
- 1 egg
- 1 tablespoon milk
Optional
- Coarse sugar for sprinkling
Instructions
- Preheat and Prepare: Preheat your oven to 375°F (190°C) and line a baking sheet with parchment paper to prevent sticking and ensure easy cleanup.
- Mix the Filling: In a medium bowl, combine the pumpkin purée, brown sugar, pumpkin pie spice, vanilla extract, and salt. Stir until the mixture is completely smooth and well blended.
- Cut Dough Circles: Roll out the refrigerated pie crusts on a lightly floured surface to prevent sticking. Use a cookie cutter or a glass to cut circles approximately 3 to 4 inches in diameter.
- Assemble the Pies: Place half of the dough circles on the lined baking sheet. Spoon about 1 tablespoon of the pumpkin filling onto the center of each circle, leaving a border around the edges free of filling.
- Seal the Pies: Brush the edges of the dough circles with a little water to help them stick, then top with the remaining dough circles. Press the edges together firmly using a fork to seal. Cut a small slit on the top of each pie to allow steam to escape during baking.
- Apply Egg Wash: Whisk the egg and milk together to make an egg wash. Brush this mixture evenly over the tops of the pies to give a beautiful golden color after baking. Sprinkle coarse sugar on top if desired for extra crunch.
- Bake: Place the baking sheet in the oven and bake for 18 to 22 minutes until the pies are golden brown and cooked through.
- Cool and Serve: Allow the pies to cool slightly on the baking sheet before serving to let the filling set and avoid burns.
Notes
- For a vegan version, substitute the pie crust with a plant-based option and use non-dairy milk to brush the tops instead of the egg wash.
- You can drizzle with icing after baking for added sweetness and decorative appeal.
- Make sure to seal the edges well to prevent the filling from leaking during baking.
- If you prefer crispier pies, bake an additional 2-3 minutes but watch closely to avoid burning.


